


If you own a Holden Cruze, you know that keeping your vehicle in top shape is essential for performance and longevity. Among the many components under the hood, one often overlooked part is the rocker cover gasket. This little hero plays a critical role in maintaining engine integrity by preventing oil leaks and ensuring the proper function of various engine parts.
But what happens when it starts to fail? You may notice some telltale signs indicating it’s time for a replacement. Thankfully, replacing the Rocker Cover Holden Cruze gasket isn’t as daunting as it seems. You can tackle this DIY project yourself with some basic tools and guidance! Get ready to roll up your sleeves as we delve into everything from identifying common issues to step-by-step instructions on replacing the rocker cover gasket in your trusty Holden Cruze. Let’s dive right in!
 Understanding The Role of The Rocker Cover Gasket In A Holden Cruze
The rocker cover gasket plays a crucial role in your Holden Cruze’s engine. It seals the area between the rocker cover and the cylinder head, preventing oil leaks that could lead to serious damage. This small but essential component ensures that oil remains contained within the engine, providing lubrication where needed most.
Oil can seep out without a properly functioning gasket, creating potential hazards for your vehicle’s performance. A leaking gasket can reduce oil levels and cause contaminants to enter critical engine components. Over time, this may increase wear and tear on parts such as bearings and camshafts.
The rocker cover gasket also helps maintain optimal pressure within the engine system. Keeping everything sealed tightly contributes to efficient operation and fuel economy. When issues arise with this part, you might experience reduced efficiency or even unusual noises from under the hood.
Regular inspections of your rocker cover are vital for maintaining overall engine health. Addressing any signs of wear promptly will save you time and money in repairs later on.
Understanding its importance highlights why replacing a faulty rocker cover gasket should be prioritised on every Cruze owner’s maintenance list.
Common Signs Of a Leaking Rocker Cover Gasket
If not addressed promptly, a leaking rocker cover gasket can lead to engine trouble. One of the first signs to look out for is an oil leak. You might notice oil pooling or dripping from the top of the engine, often near the rocker cover itself.
Another common indicator is a burning smell. Detecting a burnt oil odour while driving could mean leaking oil is coming into contact with hot engine components. This situation demands immediate attention to prevent further damage.
In addition to these visual and olfactory cues, listen for unusual noises. A failing gasket may cause increased valve noise due to improper sealing of the rocker cover. Your engine might sound different than usual as air escapes through gaps in the seal.
You may also spot residue around your spark plugs or ignition coils if there’s significant leakage. Oil seeping into these areas can affect performance and potentially cause misfires.
Watch for changes in your vehicle’s performance or fuel efficiency. Poor sealing caused by a compromised gasket can disrupt engine function, leading to decreased power and responsiveness on the road.
Tools And Materials Needed for The Replacement
Before replacing your rocker cover gasket, it’s essential to gather the right tools and materials. Having everything on hand will make the process smoother and more efficient.
Start with basic hand tools such as a socket set, wrenches, and screwdrivers. These will help you remove the existing rocker cover without any hassle. A torque wrench is also crucial for ensuring that you reattach bolts to the manufacturer’s specifications.
Next, you’ll need a new rocker cover gasket designed for your Holden Cruze. This is vital because an improper fit can lead to future leaks or issues. Always opt for high-quality gaskets made from durable materials.
Remember sealant! Some models recommend using RTV (Room Temperature Vulcanizing) silicone around specific areas of the gasket surface for extra security against leaks.
Have some shop towels to clean up oil spills during removal and installation. Keeping your workspace tidy helps you focus better on replacing that rocker cover quickly.
Safety Tips Before Starting the Replacement Process
Safety should always be a priority when tackling car repairs. Before you replace the rocker cover gasket in your Holden Cruze, take some time to ensure your workspace is safe and organized. A clutter-free area minimizes distractions and potential hazards.
Wearing appropriate personal protective equipment (PPE) is crucial. Gloves protect your hands from oil, grease, and sharp edges, while goggles protect your eyes from dust or debris that can fly around. This simple step enhances safety considerably.
Next, make sure the engine is cool before starting any work. Working on a hot engine can lead to burns or injuries. Allowing sufficient cooling time protects you and makes handling components easier.
Ensure that you have all the necessary tools within reach before beginning the job. This prevents unnecessary trips back and forth, which could lead to accidents if you’re not paying attention to your surroundings.
Disconnect the battery’s negative terminal before working on electrical components near the rocker cover gasket area. This reduces the risk of short circuits or electric shocks as you effectively maneuver through this repair task.
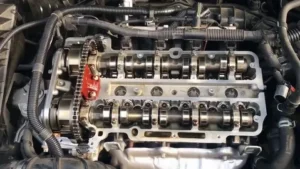
Step-By-Step Guide to Removing the Old Traxx Rocker Cover
Before you begin, ensure the engine is cool and disconnect the battery. This step prevents any electrical issues while you work on your Traxx Rocker Cover. Once that’s done, locate the rocker cover on top of the engine; it typically has several bolts securing it.
Use a ratchet and socket to remove these bolts carefully. It’s helpful to keep them organized as you take them off, so reinstallation will be easier later. After all bolts are removed, gently pry up the rocker cover using a flat-head screwdriver if needed—be cautious not to damage any surrounding components.
Once lifted, inspect for any debris or oil build-up around the edges of the cover and gasket area. Clean this with a rag or soft brush before proceeding further. Pay attention to how tightly everything was secured before removal; this can help during reassembly.
If any remaining bits of old gasket material are stuck in place, use a plastic scraper for gentle removal—metal tools can scratch surfaces and lead to leaks later. With everything cleared out, you’re ready to inspect both parts before installing your new rocker cover gasket.
Inspecting The Rocker Cover and Surrounding Components
Examine the Rocker Cover
Start by closely inspecting the rocker cover for any signs of damage or warping. A warped or uneven surface can prevent a proper seal, leading to oil leaks. Check both the top and underside of the cover for any irregularities, and ensure there is no excessive buildup of dirt or oil residue.
Inspect the Bolts
Check the condition of the bolts used to secure the rocker cover. Bolts should be free from rust or corrosion, as damaged bolts may lead to improper torque during installation. Replacing damaged bolts can help avoid future leaks and ensure a secure fit.
Assess Nearby Components
Inspect other nearby components such as spark plugs and ignition coils. Oil leaks from a failed gasket may have affected these parts, potentially leading to misfires or other performance issues. Replacing or cleaning these components if necessary can prevent future engine problems.
Clean Surfaces Thoroughly
Wipe away any residual oil or dirt from the mating surfaces around where the new gasket will be installed. Clean surfaces are crucial for achieving an effective seal, which helps keep the engine running smoothly and prevents oil leakage after reassembly.
Installing The New Rocker Cover Gasket
Installing the new rocker cover gasket is crucial in ensuring your Holden Cruze runs smoothly. Begin by carefully positioning the new gasket onto the cleaned rocker cover. Ensure it sits evenly and aligns perfectly with all bolt holes to prevent future leaks.
Next, a small amount of gasket sealant should be applied on both sides of the gasket for added security. This extra layer helps fill minor imperfections, creating a tighter seal to withstand engine vibrations and heat fluctuations.
With the gasket in place, carefully lower the rocker cover onto the engine block. Align it accurately with all mounting points before you start securing it down. It’s essential to avoid pinching or twisting the gasket during this process.
First, begin tightening each bolt hand-tight, moving in a crisscross pattern from one side to another. This approach ensures even pressure distribution across your new rocker cover gasket.
Once everything feels snug, use a torque wrench set to manufacturer specifications for final adjustments. Proper torque prevents over-tightening and protects your new gasket and rocker cover from damage.
Final Checks and Testing for Leaks
Once you’ve installed the new rocker cover gasket, it’s time for some crucial final checks. Start by ensuring that all bolts securing the rocker cover are tightened to the manufacturer’s recommended torque specifications. This step is vital for preventing future leaks.
Next, reconnect any electrical connectors or hoses you removed during the process. Be sure everything is securely attached and properly routed to avoid interference with moving parts.
Now, it’s time for a visual inspection. Look around the edges of your newly installed gasket for any signs of misalignment or gaps. A well-fitted gasket should sit flush against the rocker cover without bulges or uneven surfaces.
After confirming alignment, let your engine idle for a few minutes. Listen carefully for any unusual noises that could indicate an installation or component damage issue.
As your engine runs, check beneath it and along the sides where you worked on installing the rocker cover gasket. Watch for oil drips forming; this will help identify if there are still leaks present after replacing your old gasket.
Conclusion
Replacing the rocker cover gasket in your Holden Cruze is manageable for those willing to get their hands dirty. It’s an essential procedure that helps maintain engine performance and prevents costly repairs.
By following the steps outlined, you can tackle this project with confidence. A little patience and attention to detail will go a long way in ensuring everything is done correctly.
Once installed, it is crucial to monitor your new gasket’s performance. Regular checks can help prevent surprises later on. If you notice any issues, addressing them early saves time and money.
Taking care of your vehicle means being proactive about maintenance tasks like these. The satisfaction of completing such jobs yourself cannot be overstated; it’s rewarding to know you’ve improved your car’s reliability.
Don’t hesitate to reach out if you have questions or encounter difficulties. Engaging with communities online can provide additional support and tips from fellow enthusiasts who’ve navigated similar challenges.
FAQs
What does a rocker cover do in a Holden Cruze?
The rocker or valve cover protects the engine’s internal components while sealing in oil and preventing leaks. The gasket ensures an airtight seal between the rocker cover and the engine block.
How often should I replace my rocker cover gasket?
A good rule of thumb is to inspect your gasket every 60,000 miles or when you notice signs of wear or leakage. Factors such as temperature fluctuations and soil type can affect longevity.
Can I drive with a leaking rocker cover gasket?
While short distances might be manageable, driving for long periods with a leak is not advisable. Oil loss can lead to serious engine damage over time.
What happens if I don’t replace my rocker cover gasket?
Failing to address a leaking gasket can decrease performance due to low oil levels. It may also cause further damage by allowing contaminants into your engine.
| Related Business Listings |
| Contact Directory |
| Local Business Profiles |